Another common call we get at VaporWarehouse is from customers struggling to change the screen in their
Vaporbrothers EZ Change Whip. If you don't know what the process of changing the screen involves it may not be so "easy" to replace the screen.
Note: For those of you that lack the patience to read this post or need a visual aid, a video is featured at the end of this text demonstrating the process for replacing the screen in a Vaporbrothers EZ Change Whip.
The first thing I recommend doing is to familiarize yourself with the individual whip parts. In the event you need to call us for assistance or to order a replacement part, knowing the correct names of the whip parts will come in handy.
The Vaporbrothers EZ Change Whip consists of the following parts:
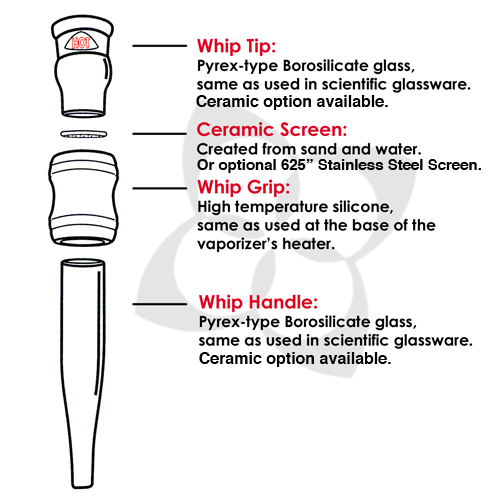
I like to refer to the combination of the Whip Tip, Whip Grip, and Whip Handle as the "Handpiece". The Handpiece connects to one end of the Hose while the Mouthpiece connects to the other end.
To replace the screen, hold the Whip Grip in one hand. Using you other hand bend the Whip Tip off, like you are trying to snap the whip in two. Do not try to pull or unscrew the Whip Tip from the Whip Grip as this will create resistance making it harder to remove the Whip Tip.
Once the Whip Tip is removed from the Whip Grip, remove the screen from inside the Whip Grip. You may have to remove the Whip Grip from the Whip Handle to push the screen out of the Whip Grip. To remove the Whip Grip from the Whip Handle, bend it off like you did to remove the Whip Tip.
A common mistake customers make is they try to shove the screen through the Whip Tip while it is attached to the Whip Grip. Do not attempt this as the screen will not stay in place.
If you look inside the Whip Grip with nothing attached to it, you will notice there is a lip or a ledge in the center. This lip is where you need to place the screen. You have the option of using either a .625" stainless steel or ceramic screen with the EZ Change Whip.
Place your screen inside the Whip Grip until is rests flat on the lip. Push the Whip Tip back onto the Whip Grip, this will sandwich the screen between the two parts and prevent it from moving or slipping out.
If you are using a single screen, always place the screen on the same side of the Whip Grip that houses the Whip Tip. If you are using two screens, always place a screen on each side of the Whip Grip. Do not place a screen onto of another screen as this will result in poor airflow and performance.
Now that you have your vaporizer whip assembled, it is ready to use. When loading the blend into the whip, use care not to overload the whip as this will reduce the airflow and create more heat within the whip.
Once you have master the art of replacing the screen in a Vaporbrothers EZ Change Whip, the whole process can be done in under 10 seconds.